Aluminum flood gate inspection after flooding should establish whether the panel, supports, seals, and building interfaces remain suitable for another deployment. A gate that kept most water out may still have suffered deformation, loosened fixings, or damaged gaskets. Successful performance during one event is not by itself permission to return the system to service.
For facility teams and contractors, the inspection should produce a recorded decision: ready for use, repair required, or specialist assessment required. The checklist below supports that process while leaving product-specific limits and structural acceptance to the manufacturer and responsible engineer.
Safe Access and Event Information
Begin only when the site can be accessed safely and water levels permit the work. Do not loosen a gate holding differential water pressure. Safe removal conditions depend on the system and the surrounding flood situation.
Follow the site’s arrangements for electrical hazards, unstable structures, and contaminated floodwater. If the entrance or adjacent wall shows movement or significant damage, obtain the necessary assessment before approaching or dismantling the assembly.
Record the opening identifier and the event conditions before cleaning removes evidence. Note the estimated maximum water level relative to the threshold, duration if known, visible debris impact, and any overtopping. Distinguish observations from estimates.
Record the deployment team and any operational problems. Difficulty installing the gate, unusual tightening, missing parts, or late deployment can help explain damage and leakage. Keep photographs from safe locations with the event record.
Compare the event with the approved operating scope. Exposure beyond the specified water depth, direction, or impact conditions needs review even where obvious damage is absent.
Panel Shape, Surface, and Connections
Inspect the panel for dents, bowing, twisting, cracks, and damage around handles or connection points. Compare its shape with the pre-event record or the manufacturer’s inspection method where available.
Pay attention to the sealing edges. A dent in a non-contact area may have a different consequence from a small deformation along a gasket seating face. Record both the location and extent rather than classifying damage only by appearance.
Look for abrasion or gouges caused by debris. Damage that removes a finish may need treatment, while damage affecting the section or joint geometry may require a structural assessment. The repair category should be established by the responsible supplier or engineer.
For divided gates, examine the center connection and mating edges. Check whether parts remain aligned and whether any fasteners or locating features have shifted. A joint that can still be forced together is not necessarily acceptable.
Do not straighten, grind, weld, or drill the panel as an improvised repair. These actions can alter strength, finish, or sealing geometry. Obtain an approved repair method or replacement decision.
Frames, Anchors, and Foundations
Inspect fixed frames for displacement, distortion, and changes in their contact with the building. Look for new gaps behind the frame, cracking near fixings, missing fasteners, and signs of base plate movement.
A loose fixing requires investigation of its cause. Simply tightening it may not repair damaged substrate, anchor movement, or a distorted connection. Follow the approved inspection and repair requirements for the actual anchorage.
Inspect the wall and floor receiving the loads. Check for cracking, spalling, loosened masonry, erosion, and damaged sill material. The gate assembly may look intact while its supporting structure has deteriorated.
For removable center posts, examine the post, socket, base plate, and surrounding floor. Check for debris inside sockets and movement at the connection. Clean only after recording any signs that may be relevant to the assessment.
If the event caused visible structural movement or impact, keep the system out of service until the required specialist review is complete. An operational dry fit does not establish that a damaged support can carry the next flood load.
Seals and Building Interfaces
Inspect the full length of every seal, including corners and intersections. Look for cuts, torn sections, displaced profiles, swelling, unusual hardness or softness, and poor recovery after removal.
Clean carefully enough to expose the actual condition. Mud can conceal a tear or hold a seal out of position. Use approved cleaners and avoid scraping with tools that can damage rubber or contact surfaces.
Assess persistent flattening against the manufacturer’s criteria. A visible compression mark is not automatically a failure, but a profile that does not recover sufficiently may no longer reach the required contact condition.
Check the permanent frame-to-wall and frame-to-floor sealing details. Loss of adhesion, gaps, or washed-out bedding can provide a bypass route even where the operational gasket remains sound.
If unusual chemical contamination occurred, request compound-specific guidance. Swelling or softening can indicate a compatibility problem. Do not return an affected gasket to service solely because it appears clean after rinsing.
Hardware and Functional Checks
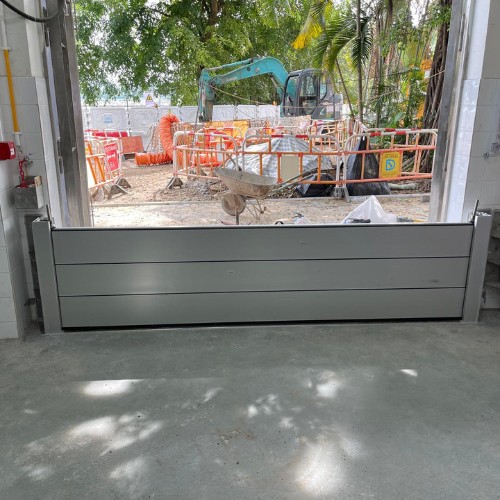
Inspect latches, compression screws, guides, hinges where present, and locating components. Check for damaged threads, bent parts, missing retainers, seized movement, and corrosion affecting operation.
Lubricate only the components and locations identified in the maintenance instructions. Keep lubricants away from seals unless their use is specifically approved. A product suitable for metal hardware may be incompatible with the gasket.
Once the assembly is considered safe for a dry check, install it using the normal sequence. Confirm seating, joint alignment, and access to each closure device. Operators should not need to force components or exceed the approved adjustment limits.
A dry check verifies fit and operation, not water performance under load. Where damage, leakage, or repairs justify further testing, agree the procedure and acceptance criteria with the manufacturer and project team.
Record which checks were completed and which remain outstanding. Do not use a general “tested” label where only a visual inspection or dry assembly occurred.
Return-to-Service Checklist
Use a checklist tied to the gate’s approved drawings and maintenance instructions. The following categories help ensure the inspection reaches a clear outcome rather than ending with photographs alone.
| Inspection category | Record | Escalation trigger |
|---|---|---|
| Event exposure | Water level, duration, impact, and overtopping | Conditions outside the approved scope |
| Panel | Shape and sealing-edge condition | Deformation, cracks, or damaged joints |
| Supports | Frame, anchors, substrate, and center connection | Movement or structural damage |
| Seals | Continuity, retention, recovery, and contamination | Tears, displacement, or material change |
| Hardware | Correct and controlled operation | Bent, seized, or missing components |
| Verification | Dry checks and any agreed tests | Unresolved fit or performance concern |
Classify the result explicitly. A serviceable gate has completed the required checks with no unresolved issue affecting its approved function. A repair-required gate remains unavailable until the identified work and verification are complete. A specialist-review gate remains unavailable pending a documented assessment.
Keep repaired or rejected parts separate from usable components. Update panel labels or status records so another shift does not deploy a gate that is awaiting approval.
Cleaning, Records, and Response Improvements
After assessment and approved repairs, clean, dry, and store the panel as instructed. Check that the complete component set is returned to its assigned location and required tools are available.
Retain inspection photographs, repair details, replacement part identification, and the return-to-service decision. Record who completed the work and who approved any structural or product-specific repair.
Use the event to improve operations. If leakage came from dirt beneath a gasket, strengthen the pre-deployment cleaning check. If a component was difficult to retrieve, revise storage or staffing. If water bypassed the gate, assign a separate building or drainage investigation.
Do not confuse operational improvements with an increased flood rating. Changes to the required water level or protection strategy need a fresh design review, not merely a revised deployment checklist.
Conclusion
Post-flood inspection for aluminum flood gate should connect observed damage and event conditions to a documented reuse decision. Examine the panel, supports, seals, interfaces, and hardware as one assembly. Resolve repairs and required assessments before returning it to service, then preserve the records and operating lessons needed for the next deployment.